Category:

Home Improvement

Eavestrough Maintenance 101: How to Keep Your Gutters Clean & Functional

Proper eavestrough maintenance is essential for protecting your home from water damage, foundation issues, and roof leaks. Whether you’re a homeowner in Hamilton or elsewhere, keeping your gutters clean and functional should be a top priority. In this guide, we’ll walk you through the basics of eavestrough maintenance, including cleaning tips, common problems, and when to call a professional—especially if you need reliable eavestrough Hamilton services.

Why Eavestrough Maintenance Matters

Eavestroughs (or gutters) direct rainwater away from your roof, walls, and foundation. When they’re clogged or damaged, water can overflow, leading to:

  • Roof leaks
  • Basement flooding
  • Mold and mildew growth
  • Foundation cracks
  • Landscape erosion

Regular maintenance prevents costly repairs and extends the lifespan of your gutters. If you’re in the Hamilton area and notice persistent issues, hiring a professional for eavestrough Hamilton repairs might be necessary.

How Often Should You Clean Your Eavestrough?

Most homeowners should clean their gutters at least twice a year—once in the spring and again in the fall. However, if your property has many overhanging trees, you may need to clean them more frequently.

Signs Your Eavestrough Needs Cleaning or Repair:

✔ Water spilling over the sides
✔ Sagging or pulling away from the roof
✔ Visible rust, cracks, or holes
✔ Plants or weeds growing in the gutters
✔ Peeling paint or water stains on siding

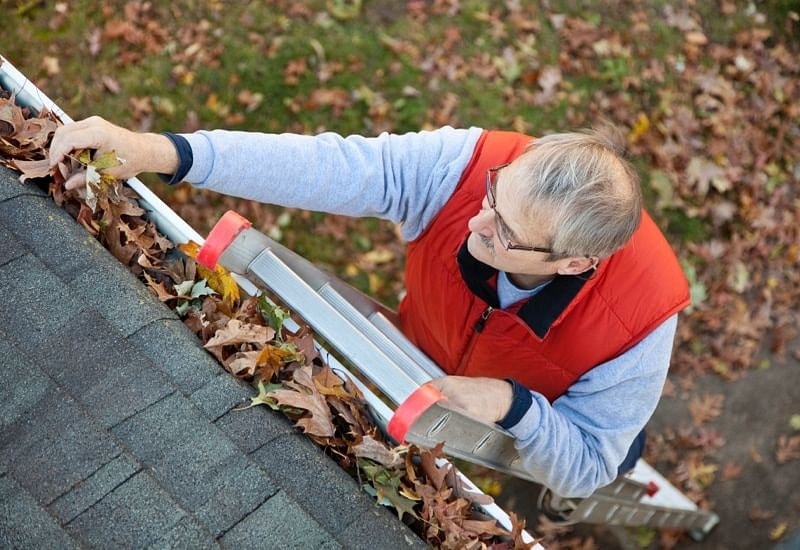
Step-by-Step Guide to Cleaning Your Eavestrough

1. Gather the Right Tools

You’ll need:

  • Sturdy ladder
  • Gloves
  • Garden trowel or gutter scoop
  • Bucket or trash bag
  • Hose with a spray nozzle
  • Safety goggles

2. Safely Position Your Ladder

Place your ladder on stable ground and have someone spot you if possible. Never lean too far—reposition the ladder as needed.

3. Remove Debris

Scoop out leaves, twigs, and dirt, placing them in your bucket or bag. Start near the downspout and work your way outward.

4. Flush the Gutters

Use a hose to rinse remaining debris and check for proper water flow. If water isn’t draining, the downspout may be clogged.

5. Check for Damage

Inspect seams, joints, and hangers for leaks or weaknesses. Small holes can often be sealed with gutter caulk, but larger issues may require professional eavestrough Hamilton services.

Preventative Maintenance Tips

1. Install Gutter Guards

Gutter guards reduce debris buildup, minimizing how often you need to clean. Options include mesh screens, foam inserts, and reverse-curve systems.

2. Trim Overhanging Branches

Cut back tree limbs near your roof to prevent leaves from falling into your gutters.

3. Ensure Proper Slope

Gutters should slope slightly toward downspouts (about ¼ inch per 10 feet). If water pools in certain spots, adjust the hangers.

4. Inspect After Storms

Heavy rain and wind can dislodge gutters or cause blockages. A quick inspection can catch problems early.

When to Call a Professional

While DIY cleaning works for minor maintenance, some situations require expert help:

  • Rust or corrosion that weakens the structure
  • Persistent leaks despite repairs
  • Improper installation causing chronic issues
  • Extensive damage from storms or age

If you’re in Hamilton and need expert assistance, a trusted eavestrough Hamilton company can provide repairs, replacements, and professional cleaning.

Final Thoughts

Regular eavestrough maintenance protects your home’s structural integrity and prevents expensive water damage. By cleaning your gutters twice a year and addressing minor issues promptly, you can avoid major headaches. And if you ever need professional help—especially for Hamilton residents—don’t hesitate to contact a reputable eavestrough Hamilton service for reliable solution

0 comment
0 FacebookTwitterPinterestEmail

Transforming Your Space – The Ultimate Guide to Home Renovation Oakville

When it comes to creating the home of your dreams, there’s no better investment than a well-planned and executed renovation. Whether you’ve lived in your Oakville home for years or just moved in, a renovation project offers the opportunity to upgrade your space and customize it to your lifestyle. Home renovation Oakville is more than just construction—it’s a journey that adds beauty, functionality, and value to your property.

In this blog post, we’ll take you through the complete guide to planning, executing, and enjoying the process of home renovation Oakville, helping you transform your house into your ideal home.

Why Choose Home Renovation in Oakville?

Oakville is known for its charming neighborhoods, historic homes, and modern communities. Many homeowners find themselves at a crossroads: Should they move or renovate? For most, the answer is clear—renovate.

Home renovation Oakville offers several key advantages:

  • Customization: Tailor your home to suit your family’s needs. 
  • Increased Value: Renovations can significantly boost resale value. 
  • Lifestyle Improvements: More space, better flow, and modern amenities. 
  • Avoid the Hassle of Moving: Stay in the neighborhood you love. 

Whether you’re updating an outdated kitchen, finishing your basement, or expanding your living room, home renovation Oakville provides long-term benefits.

Step 1: Define Your Renovation Goals

Before contacting contractors or picking out tiles, define your vision. Start by asking:

  • What are the pain points in my current layout? 
  • Which areas need the most attention? 
  • What features do I wish I had? 
  • What’s my realistic budget? 

Common home renovation Oakville projects include:

  • Kitchen renovations 
  • Bathroom makeovers 
  • Basement finishing 
  • Open-concept living space conversions 
  • Home additions (second-story or rear extensions) 

Prioritize renovations that will have the biggest impact on your comfort and daily life.

Step 2: Set a Budget and Timeline

Establishing a clear budget is crucial. Without it, costs can quickly spiral.

Here’s how to budget for home renovation Oakville:

  • Research average renovation costs in Oakville (kitchen: $25k–$50k+, bathroom: $10k–$30k+, etc.). 
  • Leave room for unexpected costs—add 10–15% buffer. 
  • Decide on the scope: cosmetic updates or full-scale remodeling? 
  • Consider financing options like HELOCs or renovation loans. 

In terms of timeline, most home renovation Oakville projects take between 1–6 months depending on size and complexity. Always account for possible delays due to permits, weather, or material availability.

Step 3: Hire the Right Professionals

A successful renovation starts with hiring the right team. Look for contractors who:

  • Are licensed, insured, and experienced 
  • Have strong references and a portfolio of completed Oakville projects 
  • Offer clear contracts and detailed quotes 
  • Provide project management and design support 

Many homeowners find that hiring a design-build firm makes home renovation Oakville more efficient. These companies handle both the design and construction, ensuring seamless communication and cohesive execution.

Step 4: Get Necessary Permits

Don’t skip the paperwork. Oakville has specific building codes and zoning regulations. Depending on your project, you may need permits for:

  • Structural changes 
  • Plumbing or electrical updates 
  • Additions or basement work 

Work with professionals who understand the home renovation Oakville permitting process. They can handle submissions, inspections, and ensure your project is up to code.

Step 5: Choose Materials and Finishes

This is the fun part—bringing your vision to life with the right design choices. Oakville homes range from traditional to modern, so choose finishes that complement your home’s architecture.

For example:

  • Kitchens: Quartz countertops, soft-close cabinets, matte black fixtures 
  • Bathrooms: Floating vanities, walk-in showers, heated flooring 
  • Basements: Vinyl plank flooring, built-in shelving, cozy lighting 

Working with a designer during your home renovation Oakville can help you make stylish, functional, and timeless decisions.

Step 6: Prepare Your Home and Family

Renovations can disrupt daily routines, so prepare accordingly:

  • Set up temporary kitchens or bathrooms if needed 
  • Store valuables safely 
  • Keep pets and children safe during construction 
  • Communicate clearly with your contractor about working hours and access 

For larger projects, consider temporarily relocating until the dust settles.

Step 7: Monitor the Project

While your contractor handles the heavy lifting, stay involved. Ask for regular updates, walkthroughs, and clarify any concerns early.

A good home renovation Oakville team will:

  • Stick to the agreed timeline and budget 
  • Maintain a clean and safe worksite 
  • Communicate openly about progress or setbacks 

Being present during the renovation allows you to make quick decisions and avoid delays.

Step 8: Enjoy the Finished Product

Once the dust has settled and the final inspection is complete, it’s time to enjoy your new space. The best part of a successful home renovation Oakville is that it reflects your lifestyle, preferences, and personality.

Celebrate with a housewarming party, document the transformation with photos, and take pride in your newly upgraded home.

Top Renovation Trends in Oakville for 2025

Looking for inspiration? Here are a few home renovation Oakville trends gaining popularity:

  • Eco-friendly features: Energy-efficient windows, smart thermostats, LED lighting 
  • Home offices: Functional work-from-home spaces 
  • Spa-inspired bathrooms: Freestanding tubs, rainfall showers 
  • Outdoor living: Decks, patios, and pergolas 
  • Open-concept kitchens: Seamless transitions between cooking and entertaining areas 

Staying on top of trends can help guide your renovation choices and add long-term value.

Final Thoughts

A well-executed home renovation Oakville isn’t just about fresh paint and new floors—it’s about improving your lifestyle, increasing property value, and falling in love with your home all over again.

From planning to execution, the key is to work with professionals who understand your vision and the unique needs of the Oakville housing market. With the right strategy and mindset, your renovation journey will be as rewarding as the final result.

0 comment
0 FacebookTwitterPinterestEmail

Proper surface preparation is crucial for successful and safe graffiti removal. It ensures effective cleaning, minimizes damage, and maximizes the chances of a complete and lasting removal Graffiti Removal Services. Here’s a step-by-step guide:

1. Assess the Surface:

  • Identify the Material: Determine the type of surface you’re dealing with (concrete, brick, metal, painted wood, etc.). Different materials require different cleaning approaches.
  • Check for Existing Damage: Inspect the surface for any pre-existing damage like cracks, chips, or peeling paint. Document any existing issues to avoid confusion later.
  • Determine Graffiti Type: Identify the type of paint used (spray paint, marker, etc.) and its age. Fresh graffiti is generally easier to remove than older, more stubborn paint.

2. Protect Surrounding Areas:

  • Cover Plants and Landscaping: If possible, cover nearby plants and landscaping with plastic sheeting or drop cloths to prevent chemical splashes and debris.
  • Protect Windows and Doors: If the graffiti is near windows or doors, cover them to prevent damage from cleaning solutions or pressure washing.

3. Prepare the Work Area:

  • Clear the Area: Remove any loose objects like furniture, toys, or gardening tools from the immediate vicinity of the graffiti.
  • Ensure Safe Access: Ensure safe and unobstructed access to the graffiti for the cleaning crew.

4. Test Cleaning Solutions:

  • Inconspicuous Area: Always test any cleaning solution or method in an inconspicuous area first to ensure it doesn’t damage the surface.
  • Observe Reactions: Monitor the test area for any adverse reactions, such as discoloration, fading, or etching.

5. Consider Environmental Factors:

  • Weather Conditions: Avoid cleaning on hot, sunny days, as the heat can cause cleaning solutions to dry too quickly and may damage the surface.
  • Wind Conditions: Strong winds can spread cleaning solutions and debris.

6. Safety Precautions:

  • Wear Protective Gear: Always wear appropriate safety gear, including gloves, safety glasses, and a mask, when working with chemicals.
  • Ensure Proper Ventilation: Ensure adequate ventilation when using solvents or other chemicals.
  • Keep Children and Pets Away: Keep children and pets away from the cleaning area during the removal process.

7. Document the Process:

  • Take Before and After Photos: Take photographs of the graffiti before and after cleaning to document the removal process and assess the results.

By following these steps and taking necessary precautions, you can effectively prepare the surface for graffiti removal, ensuring a safe and successful cleaning process. Remember to prioritize safety and choose the most appropriate cleaning methods for the specific surface and type of graffiti.

0 comment
0 FacebookTwitterPinterestEmail

Maintaining a small chest freezer is essential for keeping your food fresh, preserving quality, and extending the lifespan of the appliance. Regular care and proper handling can ensure your small chest freezer operates efficiently, saving energy and reducing the risk of costly repairs. Below are some key tips to help you maintain your small chest freezer effectively.

1. Clean Your Small Chest Freezer Regularly

Regular cleaning is crucial to maintain hygiene and prevent any build-up of ice, dirt, or odors inside your small chest freezer. Here’s how to go about it:

  • Empty the freezer: Remove all the food items and unplug the freezer.
  • Defrost: Let the ice melt completely if there is a significant build-up of frost. Use towels to absorb excess water.
  • Clean surfaces: Wipe the interior with a mixture of warm water and mild soap, avoiding harsh chemicals.
  • Dry thoroughly: Ensure the interior is completely dry before plugging it back in.

Regular cleaning every 3-4 months will help prevent mold growth and ensure the freezer runs efficiently.

2. Monitor Temperature Settings

Maintaining the correct temperature is critical for food preservation. The recommended temperature for a small chest freezer is around -18°C (0°F).

  • Check settings: Make sure the thermostat is set correctly and not fluctuating.
  • Avoid overstocking: Overloading can cause uneven cooling, leading to spoilage. Leave some space between food items for air circulation.

3. Inspect Seals and Gaskets

The seals and gaskets around the freezer door are essential for maintaining a tight seal, ensuring no cold air escapes.

  • Check for wear: Inspect the seal for any cracks or deterioration that could reduce efficiency.
  • Clean regularly: Clean the seals with mild soap and water to remove dirt and debris, preventing the buildup of moisture.

If seals are damaged or do not close tightly, consider replacing them to maintain optimal cooling performance.

4. Organize and Rotate Food

Efficiently organizing your freezer can help maintain proper temperature and reduce food waste.

  • Group items: Store similar items together to avoid digging through multiple layers.
  • Label food: Use labels for frozen items with the date to ensure you consume older items first.
  • Rotate stock: Regularly rotate frozen items so older items are consumed before new ones are added.

Proper organization reduces the chances of finding freezer-burned items and optimizes space.

5. Monitor Energy Usage

Maintaining energy efficiency is important for reducing utility costs.

  • Clean coils: Dust or debris on the condenser coils can reduce efficiency. Clean them every 6-12 months.
  • Check placement: Ensure the freezer is level and placed in a well-ventilated space away from direct sunlight or heat sources.

Regular maintenance of these components will contribute to energy efficiency, reducing running costs.

6. Perform Regular Maintenance and Repairs

Preventive maintenance will save you from costly repairs in the future.

  • Inspect for leaks: Regularly check for any leaks or unusual noises.
  • Service technician: Schedule a professional checkup once a year to ensure all components are working properly.

Small chest freezer maintenance is an investment in long-term performance and reliability.

By following these tips, you can ensure your small chest freezer functions optimally, preserving your food and reducing potential repair costs. Regular care and attention are key to maximizing its efficiency and longevity.

0 comment
0 FacebookTwitterPinterestEmail

Embarking on a home renovation project can be an exciting but overwhelming task. Whether you are upgrading a single room or undertaking a full-scale transformation, careful planning and selecting the right services are crucial to achieving the results you desire. Below are some essential services to consider before diving into your home renovation journey.

Residential Kitchen Remodeling: Transforming the Heart of Your Home

One of the most impactful renovations you can make is residential kitchen remodeling. The kitchen is often considered the heart of the home, where families gather, meals are prepared, and memories are made. A kitchen remodel can enhance both the functionality and aesthetics of this important space. From updating appliances to reconfiguring layouts and upgrading cabinetry, a well-designed kitchen can dramatically improve your home’s value and usability. Be sure to work with experienced contractors who can guide you through selecting materials, layouts, and finishes that fit your lifestyle.

Home Addition Contractor: Expanding Your Living Space

If you’re looking to increase your living space, a home addition contractor is an essential service to consider. Whether you’re adding an extra bedroom, expanding the living room, or building a sunroom, home additions provide you with the opportunity to grow your home to meet your evolving needs. Hiring a reliable contractor ensures that the addition is seamlessly integrated into the existing structure and that local building codes and permits are adhered to. Home additions are a great way to enhance both the functionality and value of your property without the hassle of moving.

Flooring Installation: Setting the Foundation for Style

The right flooring can significantly enhance the appearance and feel of your home. Whether you’re renovating a single room or the entire house, flooring installation is a key service to consider. Options like hardwood, tile, laminate, and carpet offer different aesthetics and benefits, such as durability, ease of maintenance, and comfort. Professional installation ensures that your floors are laid correctly, avoiding issues like uneven surfaces or premature wear. Selecting the right flooring for your space will complement your renovation and provide long-lasting beauty.

Plumbing Services: Ensuring Proper Functionality

When renovating, especially in kitchens and bathrooms, plumbing services are essential. Whether you’re replacing old pipes, upgrading fixtures, or installing new plumbing systems for added features like a wet bar or a larger bathtub, hiring a licensed plumber is necessary to ensure everything works smoothly. Improper plumbing installation can lead to leaks, water damage, and costly repairs down the road. Professional plumbing services ensure your renovation stays within budget and doesn’t compromise the functionality of your home.

Electrical Services: Powering Your Renovation

Any home renovation that involves significant changes to the layout or design often requires electrical services. This is particularly important if you’re planning to update lighting fixtures, add outlets, or install new appliances. Electrical work should only be handled by a licensed electrician to prevent hazards like short circuits or fire risks. Proper electrical wiring and installations can improve energy efficiency and ensure that your home remains safe and functional after the renovation is complete.

Painting and Finishing: Final Touches for a Polished Look

Once the major renovations are completed, don’t overlook the importance of painting and finishing. A fresh coat of paint can completely transform the look of any room, from the kitchen to the living room. Whether you opt for traditional paint or more modern finishes like wallpaper or accent walls, professional painters ensure that your space looks polished and cohesive. Painting not only improves the aesthetic appeal but also provides a protective layer for your walls and surfaces.

Landscaping and Exterior Services: Enhancing Curb Appeal

Home renovations don’t always stay inside the walls. Landscaping and exterior services play an important role in boosting the curb appeal and overall appearance of your home. Whether you’re installing a new patio, planting a garden, or adding a new driveway, exterior improvements can increase your home’s value and create an inviting outdoor space. A landscaping professional can help you design a garden or yard that complements the style of your home while taking into consideration factors like climate and soil conditions.

Conclusion

Before starting any home renovation, it’s crucial to plan carefully and engage the right services. From residential kitchen remodeling and home additions to flooring installation, plumbing, electrical work, and more, each step plays a pivotal role in transforming your home into a more functional and aesthetically pleasing space. Working with experienced professionals can help ensure the success of your renovation, prevent costly mistakes, and allow you to enjoy your updated home for years to come.


0 comment
0 FacebookTwitterPinterestEmail

Floor pillows, also known as futons or floor cushions, can add a touch of comfort, style, and versatility to any space. Here are eight creative ways to incorporate floor pillows into your home decor:

1. Create a Cozy Reading Nook

  • Place a floor pillow in a quiet corner of your living room or bedroom.
  • Add a small table or side table for holding books and drinks.
  • Drape a throw blanket over the pillow for added warmth and comfort.

2. Add a Bohemian Touch

  • Combine multiple floor pillow in different colors, textures, and patterns for a bohemian-inspired look.
  • Add other bohemian elements like macrame hangings, dream catchers, or ethnic rugs.

3. Enhance Your Bedroom

  • Use floor pillows as additional seating or sleeping surfaces in your bedroom.
  • Place them at the foot of your bed or in a corner for added comfort.

4. Create a Play Area

  • For children’s rooms, floor pillows can provide a comfortable and safe play area.
  • Add toys, games, or books to create a fun and engaging space.

5. Outdoor Seating

  • Place floor pillows on your patio or deck for comfortable outdoor seating.
  • Add cushions and throws for extra warmth and comfort.

6. Decorative Accent

  • Use floor pillows as decorative accents in your living room, bedroom, or other spaces.
  • Place them in front of a fireplace, on a coffee table, or against a wall.

7. Meditation or Yoga Space

  • Create a serene meditation or yoga space by placing a floor pillow on the floor.
  • Add a soft blanket and a few candles for a calming atmosphere.

8. Guest Seating

  • Floor pillows can provide extra seating for guests during parties or gatherings.
  • They are also a comfortable option for overnight visitors.

By incorporating floor pillows into your home decor, you can create a more comfortable, stylish, and inviting space. Experiment with different arrangements and combinations to find the perfect look for your home.

0 comment
0 FacebookTwitterPinterestEmail

Luxury vinyl flooring (LVF) has gained immense popularity in recent years due to its versatility, durability, and aesthetic appeal. Whether you’re renovating your home or designing a new space, choosing the right style of luxury vinyl flooring is crucial for achieving your desired look and functionality. This guide will help you navigate the selection process.

Understanding Luxury Vinyl Flooring

Luxury vinyl flooring is designed to mimic the appearance of natural materials like hardwood, stone, or ceramic tile, but with added benefits. It’s water-resistant, easy to clean, and often more affordable than its natural counterparts. Understanding the different types and styles of LVF will help you make an informed choice.

Assessing Your Space

Consider the Room’s Functionality

The first step in choosing luxury vinyl flooring is to consider the room’s purpose. High-traffic areas, such as hallways and living rooms, require durable options that can withstand wear and tear. In contrast, bedrooms may benefit from softer, warmer styles that enhance comfort.

Evaluate the Room’s Lighting

Lighting can significantly affect how flooring appears. Natural light, artificial light, and the room’s color scheme will influence your choice. Lighter shades can make a small space feel larger and brighter, while darker tones add warmth and coziness to larger rooms.

Choosing the Right Style

Plank vs. Tile

Luxury vinyl flooring comes in two main styles: plank and tile.

  • Plank: This style mimics hardwood and is ideal for creating a classic or rustic look. Plank options are available in various widths and lengths, allowing for diverse installation patterns.
  • Tile: Designed to imitate ceramic or stone, tile luxury vinyl flooring is perfect for bathrooms and kitchens. It offers a sophisticated appearance and can withstand moisture.

Patterns and Textures

Consider the pattern and texture of the flooring. Textured finishes can add depth and character, while smooth finishes create a sleek, modern look. Additionally, patterns like herringbone or chevron can make a bold statement in any room.

Color Selection

Neutral vs. Bold Colors

Neutral colors, such as greys, beiges, and whites, are versatile and can easily complement various decor styles. On the other hand, bold colors or unique patterns can serve as a focal point in a room. Consider the existing color scheme and furnishings when making your choice.

Sample Testing

Always request samples of your selected luxury vinyl flooring styles. Place them in the actual space to see how they look in different lighting conditions throughout the day. This step will help you visualize the final result and ensure you’re happy with your choice.

Installation Considerations

Professional vs. DIY

Decide whether you want to install the flooring yourself or hire a professional. While many luxury vinyl options are designed for easy DIY installation, complex patterns may require expert assistance. Consider your skill level and the time you have available.

Underlayment

Using an underlayment can enhance comfort and sound absorption. Some luxury vinyl flooring products come with built-in underlayment, but if yours doesn’t, consider adding it for improved performance.

Maintaining Your Luxury Vinyl Flooring

One of the advantages of luxury vinyl flooring is its low maintenance requirements. Regular sweeping and occasional mopping will keep it looking great. Be sure to follow the manufacturer’s care instructions to prolong its lifespan.

Conclusion

Choosing the right style of luxury vinyl flooring for your space involves careful consideration of functionality, aesthetics, and personal taste. By assessing your space, exploring various styles and colors, and considering installation options, you can select the perfect luxury vinyl flooring that enhances your home’s beauty and functionality. Whether you prefer the look of hardwood or the elegance of stone, LVF offers endless possibilities for your design needs.

0 comment
0 FacebookTwitterPinterestEmail

Bathroom renovation is a thrilling venture that breathes new life into one of the most essential spaces in any home. For homeowners in Auckland, blending functionality with style is key to creating a bathroom that not only meets daily needs but also serves as a relaxing retreat. Whether you’re starting from scratch or updating an existing bathroom, this guide offers inspiration on the latest trends in fixtures and finishes to transform your space into a sanctuary.

Modern Fixtures for a Sophisticated Look

Sleek Shower Systems

Auckland homeowners are increasingly favoring sleek and modern shower systems that offer both style and efficiency. Frameless glass shower enclosures provide a minimalist aesthetic, allowing for a more open and airy feel. Rainfall showerheads and multi-jet systems add a touch of luxury, making every shower an indulgent experience.

Statement Bathtubs

Freestanding bathtubs have become a popular choice in bathroom renovation. Their sculptural forms make them the centerpiece of the bathroom. From classic clawfoot tubs to contemporary soaking tubs, these fixtures add a touch of elegance and sophistication. Materials like acrylic, stone, and cast iron offer various aesthetic and functional benefits, ensuring there’s a perfect option for every style preference.

Innovative Faucets

When it comes to faucets, Auckland homeowners are embracing innovation and design. Matte black and brushed gold finishes are trending, providing a modern and upscale look. Touchless faucets add a layer of convenience and hygiene, while waterfall spouts create a serene and spa-like atmosphere.

Elegant Finishes to Elevate Your Space

Luxurious Tiles

Tiles play a crucial role in setting the tone for a bathroom renovation. Large format tiles are in vogue, reducing grout lines and creating a seamless look. Porcelain and ceramic tiles are favored for their durability and versatility. For a more luxurious touch, consider marble or natural stone tiles, which add a timeless elegance to any bathroom.

Eye-Catching Wall Treatments

Wallpaper and wall panels are making a comeback in bathroom design. Waterproof wallpapers with bold patterns or subtle textures can transform an ordinary bathroom into a stylish retreat. Wall panels made from materials like shiplap, beadboard, or even reclaimed wood bring warmth and character to the space.

Stylish Vanities

The vanity is a focal point in bathroom design. Floating vanities are popular for their modern and clean look, giving the illusion of more space. For a touch of luxury, consider vanities with integrated lighting or those made from high-end materials like quartz or granite. Customizable storage solutions ensure that your vanity is both beautiful and functional.

Lighting: The Finishing Touch

Layered Lighting

Effective lighting is essential in bathroom renovation. Layered lighting, which includes ambient, task, and accent lighting, ensures that your bathroom is well-lit and functional. Recessed ceiling lights provide overall illumination, while wall sconces and vanity lights offer focused task lighting. Accent lighting, such as LED strips under cabinets or around mirrors, adds a touch of drama and sophistication.

Statement Light Fixtures

Chandeliers and pendant lights are no longer reserved for living rooms and dining areas. These statement fixtures can add a touch of glamour and elegance to a bathroom. Consider a chandelier above a freestanding bathtub or pendant lights flanking a mirror to create a visually stunning focal point.

Embrace Smart Technology

Smart Mirrors

Smart mirrors with built-in lighting, defogging capabilities, and Bluetooth connectivity are becoming a staple in modern bathroom renovations. These mirrors combine functionality with cutting-edge technology, making daily routines more convenient and enjoyable.

Heated Flooring

For a touch of luxury and comfort, consider installing heated flooring. This feature is especially appreciated during Auckland’s cooler months, providing warmth and a spa-like experience. Electric or hydronic systems are available, catering to different budgets and installation requirements.

Sustainable Choices for Eco-Friendly Living

Water-Saving Fixtures

Sustainability is a growing concern for many homeowners in Auckland. Water-saving fixtures, such as low-flow toilets and showerheads, help reduce water consumption without compromising performance. These fixtures not only contribute to environmental conservation but also reduce utility bills.

Eco-Friendly Materials

Using eco-friendly materials in your bathroom renovation can make a significant impact. Recycled glass countertops, bamboo cabinetry, and low-VOC paints are excellent choices for creating a sustainable and stylish bathroom. These materials are not only environmentally friendly but also add unique textures and colors to your space.

Conclusion

Bathroom renovation Auckland is an opportunity to blend style, functionality, and sustainability. By incorporating modern fixtures, elegant finishes, innovative lighting, and smart technology, you can create a bathroom that is both a practical necessity and a luxurious retreat. Whether you prefer a sleek, contemporary design or a more traditional aesthetic, there are endless possibilities to explore in your bathroom renovation journey. Embrace the trends and make your bathroom a true reflection of your taste and lifestyle.

0 comment
0 FacebookTwitterPinterestEmail

Decorative screen doors can add a touch of elegance and functionality to any home. Whether you’re aiming to enhance your curb appeal or improve your indoor-outdoor living experience, choosing the right material for your decorative screen door is crucial. Each material comes with its own set of benefits and drawbacks, so understanding these can help you make an informed decision. Here’s a comprehensive guide to the best materials for decorative screen doors, exploring their pros and cons.

1. Wood

Pros

  • Aesthetic Appeal: Wood is renowned for its classic and timeless look. It can be intricately carved and stained or painted to match your home’s decor.
  • Durability: When properly treated and maintained, wood screen doors can be very durable and long-lasting.
  • Customization: Wood offers great flexibility in terms of design. You can choose from various styles and finishes to create a unique decorative screen door.

Cons

  • Maintenance: Wood requires regular maintenance to prevent warping, rotting, or insect damage. It needs to be painted or stained periodically to maintain its appearance and protect it from the elements.
  • Cost: High-quality wood doors can be quite expensive. The initial investment and ongoing maintenance costs can add up.

2. Aluminum

Pros

  • Durability: Aluminum is highly resistant to rust and corrosion, making it an excellent choice for areas with high humidity or coastal climates.
  • Low Maintenance: Unlike wood, aluminum doesn’t require much upkeep. It’s easy to clean and doesn’t need regular painting or staining.
  • Affordability: Aluminum is generally more affordable compared to high-end wood options.

Cons

  • Limited Aesthetic Options: While aluminum can be finished in various colors, it doesn’t offer the same level of customization or natural beauty as wood.
  • Susceptibility to Dents: Aluminum can dent easily, which might affect the appearance of your decorative screen door over time.

3. Fiberglass

Pros

  • Durability: Fiberglass is resistant to weather, warping, and rotting. It’s an excellent choice for harsh climates.
  • Low Maintenance: Similar to aluminum, fiberglass doesn’t require much upkeep. It can be cleaned easily and doesn’t need painting.
  • Versatility: Fiberglass can mimic the appearance of wood and other materials, providing a range of design options for your decorative screen door.

Cons

  • Cost: High-quality fiberglass doors can be more expensive than aluminum, though they are generally less costly than high-end wood.
  • Color Fading: Over time, fiberglass can experience some color fading when exposed to direct sunlight.

4. Steel

Pros

  • Strength: Steel is extremely strong and provides excellent security for your home. It’s difficult to break or force open.
  • Durability: Steel is resistant to many of the issues that affect wood, such as warping or rotting.
  • Modern Look: Steel doors often have a sleek, modern appearance and can be powder-coated in various colors.

Cons

  • Rust: Without proper coating and maintenance, steel can rust over time, especially in humid or coastal environments.
  • Weight: Steel doors are typically heavier than those made from other materials, which can affect installation and ease of use.

5. Vinyl

Pros

  • Affordability: Vinyl is usually one of the most cost-effective options for decorative screen doors.
  • Low Maintenance: Vinyl doesn’t require painting or staining and is resistant to rot and insects.
  • Variety: Vinyl doors come in various styles and colors, offering a range of decorative options.

Cons

  • Less Durable: Vinyl is less durable than materials like steel or aluminum and may crack or become brittle over time.
  • Limited Aesthetic Appeal: While vinyl can mimic other materials, it often lacks the authentic look and feel of wood or high-quality finishes.

Conclusion

Choosing the right material for your decorative screen door depends on your specific needs, budget, and aesthetic preferences. Wood offers timeless beauty but requires maintenance, while aluminum and fiberglass provide low-maintenance options with varying levels of durability and cost. Steel offers strength and modern aesthetics, but it may require more upkeep to prevent rust. Vinyl is the most affordable and low-maintenance option but may not be as durable or visually appealing.

Consider your climate, the amount of maintenance you’re willing to perform, and the overall look you want to achieve when selecting the perfect decorative screen door material for your home.

0 comment
0 FacebookTwitterPinterestEmail

In the quest to enhance home aesthetics, homeowners are increasingly seeking innovative ideas that blend style with functionality. A well-designed interior not only reflects personal taste but also improves the overall living experience. This article explores cutting-edge strategies to elevate your home’s interior design, focusing on bathroom remodeling and room additions as key components of a transformative home makeover.

Bathroom Remodeling: Revitalizing a Vital Space

The bathroom, often considered a private sanctuary, provides a unique opportunity to create a retreat that combines comfort and luxury. Modern bathroom remodeling goes beyond traditional updates, offering a range of design options that cater to both aesthetic appeal and practical needs.

  1. Luxurious Materials and Finishes

Incorporating high-quality materials can significantly elevate the bathroom’s look and feel. Consider using marble or granite countertops, which add a touch of sophistication and durability. Elegant fixtures, such as rain showers or freestanding tubs, can transform an ordinary bathroom into a spa-like retreat. Moreover, innovative tile designs, such as large-format tiles or mosaic patterns, can enhance visual interest and create a sense of luxury.

  1. Innovative Lighting Solutions

Lighting plays a crucial role in setting the mood and functionality of a bathroom. Implement layered lighting designs that combine ambient, task, and accent lighting. Recessed lighting and wall-mounted fixtures can provide practical illumination, while LED strips under cabinets or around mirrors add a modern touch and enhance visual appeal. Consider dimmable options to adjust the lighting intensity based on the time of day and personal preference.

  1. Smart Technology Integration

Incorporating smart technology can elevate both convenience and efficiency in bathroom remodeling. Install touchless faucets and programmable shower systems that allow for customized temperature settings. Heated floors and mirrors with defogging capabilities can add comfort and practicality. Additionally, integrating smart speakers or voice-activated controls can enhance the overall experience and streamline daily routines.

Room Additions: Expanding Living Spaces with Style

Room additions offer a powerful way to expand and enhance your home’s interior space. Whether adding a new room or expanding existing ones, strategic planning and design are essential to ensure that the addition complements the home’s overall aesthetic and functionality.

  1. Seamless Integration with Existing Spaces

A successful room addition should harmonize with the existing home design. Focus on maintaining architectural consistency by using similar materials, colors, and design elements. For example, if adding a new living room or dining area, ensure that the addition aligns with the home’s existing style, such as traditional, contemporary, or modern. Smooth transitions between old and new spaces can create a cohesive look and feel.

  1. Maximizing Natural Light and Views

Incorporating large windows or glass doors in room additions can enhance natural light and connect indoor spaces with the outdoors. Consider installing floor-to-ceiling windows or sliding glass doors to create a bright and airy atmosphere. Additionally, strategically placing windows to capture desirable views can create a pleasant and inviting environment. Skylights and clerestory windows can also bring in natural light and add architectural interest.

  1. Flexible and Functional Design

When planning room additions, consider designing flexible spaces that can adapt to changing needs. Multi-functional rooms, such as a guest room that doubles as a home office or a playroom that can be transformed into a study area, offer versatility and practicality. Built-in storage solutions and modular furniture can optimize space usage and keep the room organized and clutter-free.

Conclusion

Elevating your home’s interior aesthetics involves a combination of innovative design ideas and strategic remodeling. Bathroom remodeling and room additions are powerful ways to enhance both the beauty and functionality of your living spaces. By incorporating luxurious materials, advanced technology, and thoughtful design elements, you can transform your home into a stylish and comfortable retreat. Whether through revitalizing a crucial space like the bathroom or expanding with well-designed room additions, these strategies will help you achieve a stunning and functional interior that reflects your personal style and enhances your daily living experience.

0 comment
0 FacebookTwitterPinterestEmail
Newer Posts